
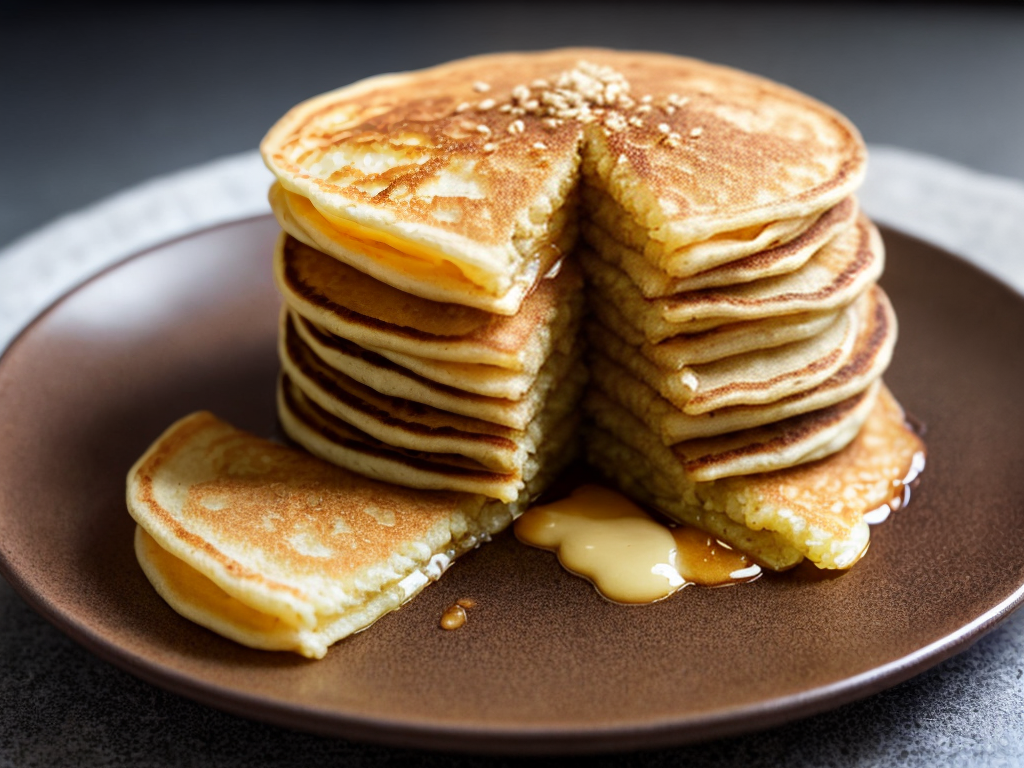
Unraveling the mystery of perfect Korean pancakes, I’ve sizzled and flipped my way to pajeon perfection. I’ll guide you through choosing the best ingredients, mixing a flawless batter, and nailing the golden crispness that makes your taste buds dance. Whether it’s the classic green onion or a seafood-packed delight, I’ve got the tips and tricks that’ll turn your kitchen into the ultimate pajeon hotspot. Join me as we dive into the savory world of Korea’s beloved pancake.
Key Takeaways
- Fresh, quality ingredients and seasonal vegetables are essential for vibrant flavors in Pajeon.
- Traditional rice flour provides an authentic and delicate texture, with alternative options like chickpea flour and buckwheat flour.
- Choosing the right flour and mixing technique is crucial for a golden, crispy texture in the batter.
- Scallions play a significant role in achieving flavor and texture balance in Pajeon.
Selecting the Right Ingredients
One cannot underestimate the importance of choosing fresh, quality ingredients when I’m aiming to create the perfect Pajeon. When I step into the kitchen, the success of my Korean pancakes hinges on the vibrancy and quality of the components I select. Ingredient freshness isn’t just a suggestion; it’s an absolute must. The crispness of the vegetables and the potency of the herbs are what bring the dish to life, offering not just complementary textures but also layers of flavor that can’t be mimicked with anything but the freshest produce.
I always keep an eye out for seasonal vegetables. There’s a certain magic in using produce that’s at its peak. It ensures that my Pajeon is not only authentic but bursting with the best flavors nature can offer. Whether it’s the zing of spring onions, the earthy sweetness of summer zucchini, or the robustness of autumn’s peppers, each season brings its gifts that I’m eager to incorporate into my recipe.
As I sift through the market stalls, I’m careful to choose vegetables that are firm, vibrant, and free of blemishes. These visual cues tell me that they’re fresh and haven’t been languishing in storage, losing their inherent zesty flavors and crisp textures. I also trust my sense of smell and touch, ensuring that each ingredient feels and smells as it should—this attention to detail is what sets a good Pajeon apart from a great one.
In the end, it’s this commitment to ingredient freshness and the celebration of seasonal vegetables that elevate my Pajeon from a mere pancake to an exquisite representation of Korean culinary tradition.
Types of Flour for Pajeon
Now, let’s talk about the foundation of any pajeon: the flour. Traditional recipes often call for rice flour, which gives the pancakes their characteristic chewy texture. But if you’re looking for something a bit different, there are wheat flour options that can add a new twist to the texture and flavor.
Traditional Rice Flour
In my quest for the quintessential pajeon, I’ve learned that the choice of flour is pivotal, and among the myriad options, traditional rice flour stands out for its authenticity and delicate texture. Rice sourcing is fundamental to this process as the quality of the rice directly impacts the flour’s texture. Flour sifting is equally essential, ensuring a uniform consistency that’s crucial for the perfect pajeon.
- Grain Selection: Only the best grains are chosen for milling.
- Milling Process: A fine grind is paramount for a smooth batter.
- Flavor Profile: Rice flour offers a subtle, distinct taste.
- Digestibility: Easier on the stomach compared to wheat.
- Texture Contribution: Creates a crisp exterior with a tender bite.
But what if you’re looking for a different twist? Let’s delve into alternative wheat options that can add a unique dimension to your pajeon.
Alternative Wheat Options
For those eager to experiment beyond traditional rice flour, various wheat flour alternatives can infuse your pajeon with exciting new textures and flavors. I’ve found that incorporating different flours not only changes the taste but can also accommodate dietary restrictions.
Gluten-free options like chickpea flour or almond flour are fantastic for those avoiding gluten. They bring a nutty flavor and are packed with nutrients. On the other hand, buckwheat flour offers unique buckwheat benefits. It’s rich in antioxidants and fiber, plus it adds a robust, earthy taste to the pajeon.
Here’s a quick guide to some flour options:
| Flour Type | Flavor Profile | Gluten-Free |
|---|---|---|
| Chickpea | Nutty | Yes |
| Buckwheat | Earthy | Yes |
| Almond | Mild, Nutty | Yes |
Preparing the Batter Mixture
Now that we’ve chosen our flour, let’s tackle the batter mixture, which is crucial for that authentic pajeon texture. I’ll guide you through the water versus broth debate and why your choice here can make or break your pancake. Also, I’ve got some tips on mixing techniques to ensure your batter is just the right consistency.
Flour Type Selection
Choosing the right flour is crucial when I’m aiming to achieve the golden, crispy texture that defines an authentic pajeon. The gluten content in the flour can make or break the consistency of my pancake. Too much gluten and my pajeon might become chewy, straying from the desired crispiness. Conversely, a flour with too little gluten won’t provide the necessary structure.
For those with allergies, finding suitable alternatives is essential. I’ve experimented with various options and have identified several that work well:
- Rice Flour: Provides lightness and is naturally gluten-free.
- Potato Starch: Adds an extra crispiness to the edges.
- Buckwheat Flour: Offers a nutty flavor and is gluten-free.
- Chickpea Flour: A protein-rich, gluten-free alternative.
- Cornstarch: Mixed with other flours to enhance crunchiness.
Water Vs. Broth Debate
Every time I prepare the batter for pajeon, I’m faced with the choice between using plain water and a rich broth to infuse the pancakes with either a subtle or more complex flavor. Opting for water offers a blank canvas, allowing the natural tastes of the ingredients to shine through. Conversely, broth introduces a depth of flavor that elevates the pajeon, making each bite a more savory experience.
Flavor enhancement with broth can be a game-changer, especially when I’m aiming to impress. But it’s not just about taste; it’s also about texture experimentation. Water can yield a crisper edge, while broth sometimes adds a slight richness to the pancake’s body. Balancing these elements is key to creating the perfect pajeon.
Mixing Technique Tips
Mastering the mixing process is crucial in achieving the delicate balance of a light yet cohesive pajeon batter. To get it just right, here are my personal tips:
- Don’t overmix; stir until the ingredients are just combined to avoid a tough texture.
- Use cold water for a crispier outcome; it helps prevent gluten development.
- Allow the batter to rest; this step ensures a more evenly cooked pancake.
- Adjust whisking speed to medium; too fast and you’ll incorporate too much air.
- Sift the flour before mixing to prevent lumps and ensure a smooth batter.
After perfecting the batter, you’re ready to personalize your pajeon. Let’s dive into choosing your add-ins for that signature touch.
Choosing Your Add-ins
I’ve discovered that the secret to a mouthwatering pajeon lies in selecting the right mix of add-ins to complement the savory pancake batter. The key here is ingredient freshness and the use of seasonal vegetables. You see, fresh ingredients not only bring the most vibrant flavors to your pajeon but also ensure that the texture of your vegetables is at its peak — crisp and delightful.
When I’m at the market, I look for what’s in season. Spring onions, zucchini, and carrots often make it into my basket. They offer a colorful contrast and a variety of textures that make each bite interesting. In the summer, I like to throw in peppers or fresh corn to give it that sweet, smoky flavor. If I’m making pajeon in fall or winter, I might opt for earthier tones like mushrooms or kimchi for that extra kick.
Beyond vegetables, seafood is a classic choice. Shrimp or squid can transform your pajeon into a hearty meal. But it’s not just about the type of seafood; the freshness is paramount. I’ll chat with the fishmonger to snag the catch of the day, ensuring that my seafood pajeon will be as flavorful as possible.
The beauty of pajeon is its versatility. You can mix and match ingredients based on what’s available and what suits your taste. Sometimes, I’ll even add a bit of cheese for a gooey twist or a handful of perilla leaves for an aromatic punch. Each ingredient adds its own unique note, creating a symphony of flavors in every bite. The possibilities are endless, but the freshness of your add-ins is what will set your pajeon apart.
Mixing in Seafood Variations
Incorporating seafood into your pajeon not only adds a burst of ocean flavor but also turns the pancake into a protein-rich meal. The key to a scrumptious seafood pajeon is undoubtedly the seafood freshness. Fresh shrimp, squids, or even oysters can elevate the pancake from good to extraordinary. I always make sure to visit my local fish market to pick the freshest catch of the day for my pajeon.
Now, let me share with you how I add a touch of the sea to my pajeon, while ensuring each bite is a delight:
- Shrimp: I like to clean and then roughly chop them, so each piece is bite-sized and distributes evenly throughout the pajeon.
- Squid: Slicing it into thin rings allows for a quicker cook time and a tender chew.
- Scallops: If I’m feeling fancy, I’ll dice these into small pieces for a subtle, sweet seafood note.
- Oysters: Adding a few whole oysters gives a juicy surprise in each bite.
- Mussels: I steam them first, remove from the shell, and scatter them throughout the batter.
Once I’ve mixed the seafood into the pajeon batter, I cook it until it’s perfectly golden and crispy. To complement the flavors, I whip up a variety of dipping sauces. A simple soy sauce and vinegar mix is my go-to, but sometimes I’ll add a dash of gochugaru (Korean chili flakes) for a bit of heat. The right dipping sauce can really make those seafood flavors pop and provide an unforgettable Korean pancake experience.
The Importance of Scallions
Scallions aren’t just a garnish; they’re the soul of a perfect pajeon. I’ll show you how picking the right variety and preparing them properly can make all the difference. We’re going to explore how these green stalks contribute to the savory flavor and satisfying texture of this beloved Korean dish.
Scallion Variety Selection
Choosing the right type of scallion is crucial to the flavor and texture of an authentic Korean pancake, or pajeon. Scallion size and flavor intensity can make or break the dish. Here’s what I always keep in mind when selecting them:
- Thickness: Opt for medium to thick scallions for a satisfying bite.
- Color: Vibrant green tops with a slight gradient to white are signs of freshness.
- Length: Longer scallions mean more volume and visual appeal in your pajeon.
- Flavor: Taste a small piece; the ideal scallion has a gentle bite without overwhelming sharpness.
- Origin: Locally grown scallions tend to be fresher, which can enhance the overall taste.
Optimal Scallion Preparation
After selecting the best scallions, I ensure they’re prepared correctly to maximize their flavor and texture in the pajeon. Scallion washing is the first step; I rinse them thoroughly to remove any dirt or grit that could spoil the texture of my pancakes. It’s not just about cleanliness, though—it’s also about water retention. A gentle pat dry is crucial to prevent sogginess.
Then, the cutting techniques come into play. I slice the scallions lengthwise if they’re particularly thick, ensuring they cook evenly within the batter. For a uniform cooking experience, I cut them into two to three-inch pieces, which also helps distribute their sharp, oniony essence throughout the pancake. It’s this attention to detail that turns good pajeon into great pajeon.
Flavor and Texture Balance
I’ve discovered that the right number of scallions is essential to achieving the delicate balance of flavor and texture in my pajeon. The crisp exterior and tender interior hinge upon how these vibrant greens are integrated. Scallions aren’t just a garnish; they’re the soul of the dish, offering a bite that’s both fresh and slightly sweet. And to complement the scallions, I’ve learned a few tricks:
- Play with spice variations to enhance the scallions’ natural kick.
- Use a mix of young and mature scallions for depth.
- Ensure scallions are evenly distributed for consistent bites.
- Pair with dipping sauces that contrast and elevate the scallion’s flavor.
- Experiment with scallion lengths for varied texture in each pancake.
These steps guarantee every pajeon I make is a harmonious symphony of taste and texture.
Perfecting the Batter Consistency
My grandmother’s secret to delectable pajeon lies in achieving a batter with the perfect balance of viscosity and smoothness. The consistency shouldn’t be too runny or too thick; it’s a delicate dance that makes all the difference. In my experience, the key to nailing this consistency every time involves two critical factors: batter additives and resting time.
Batter additives can include various flours and starches that impact the final texture. Rice flour, for example, gives a delightfully crisp edge, while a bit of wheat flour can provide a satisfying chew. Too much of either, though, and you’ll lose that signature tender center that makes pajeon so irresistible.
Resting time is another crucial element. Once I’ve mixed my batter, I let it sit for at least 30 minutes. This rest period allows the flour to fully hydrate and the gluten to relax, which means a smoother batter that spreads evenly on the pan without springing back.
Here’s a simple table that guides my approach:
| Ingredient | Purpose |
|---|---|
| Rice flour | Ensures crispiness |
| Wheat flour | Adds chewiness |
| Cold water | Prevents gluten overdevelopment |
The Art of Pouring Batter
I’ve found that mastering the pour is crucial to achieving that coveted even cook on a pajeon. I use a circular motion to distribute the batter, ensuring the thickness remains consistent from edge to edge. To prevent a soggy center, I’m careful not to pour too much batter in one spot, which is a common mistake.
Consistent Thickness
Every perfect Korean pancake owes its delectable texture to one crucial technique: maintaining a uniform thickness by mastering the art of pouring the batter. Getting that even batter distribution isn’t just about luck; it’s about understanding your skillet size and using a methodical approach. Here’s how I ensure consistent thickness every time:
- Start at the Center: Pour the batter into the middle of the skillet and let it naturally spread out.
- Circular Motion: Gently swirl the skillet to encourage even spreading.
- Control the Pour: Use a ladle or cup with a spout for precise control over the flow.
- Eye for Detail: Watch for thin spots and add a little extra batter if needed.
- Practice Makes Perfect: Don’t be discouraged by initial unevenness; perfection comes with practice.
Circular Motion Technique
Mastering the circular motion technique is key to my pajeon’s even cooking and golden-brown perfection. I’ve found that the secret lies not just in the batter, but how I pour it. I start from the center of the pan, slowly swirling outwards in a steady stream. This ensures the batter spreads thinly and evenly, eliminating any hot spots. My flipping speed is crucial too; I wait until I see the edges crisping up before I confidently slide my spatula underneath and flip. It’s all about timing—too soon and it’s a batter mess, too late and it’s overdone. Lastly, my oil choices matter. A mix of vegetable oil for high heat and a dash of sesame oil for that nutty flavor makes my pajeon simply irresistible.
Avoiding Soggy Centers
To prevent a soggy center in my pajeon, I’ve perfected the art of pouring the batter in a way that ensures it cooks evenly throughout. Here’s what I keep in mind:
- Consistent Thickness: I pour just enough batter to cover the pan in a thin, even layer.
- Cooking Oil Choices: I select a high-smoke-point oil to withstand the heat without burning.
- Preheated Pan: I always start with a well-heated pan to kickstart the cooking process.
- Heat Control Techniques: I adjust the heat as needed, starting high then lowering it to cook through without over-browning.
- Patience is Key: I resist the urge to flip too soon; letting the bottom set is crucial.
Now that we’ve covered how to avoid a soggy center, let’s dive into mastering the flip technique.
Mastering the Flip Technique
I’ve discovered that a flawless flip is essential for achieving the ideal golden-brown crust on every Korean pancake. Mastering this skill isn’t just about looking like a pro in the kitchen; it’s about the perfect texture and even cooking of your pajeon. The tools you use can make a significant difference. Pancake flipping tools like a wide, non-stick spatula are a must-have. It’s all about the wrist movement technique — a confident, quick flick that turns the pancake without hesitation or forcefulness.
To really drive the point home, let’s break down the key components:
| Aspect | Detail | Benefit |
|---|---|---|
| Tool | Wide, non-stick spatula | Ensures a full, supportive lift |
| Technique | Quick wrist flick | Minimizes breakage and splatter |
| Timing | When edges brown | Ensures even cooking |
| Confidence | Commit to the flip | Prevents folding or tearing |
| Practice | Repeat with each pancake | Builds muscle memory |
These elements are critical. You need the right tool and technique to avoid a pancake disaster. Timing is another crucial factor; flip too soon, and you’ve got a mess, too late, and it’s burnt. Confidence plays a huge role. If you hesitate, the pancake can sense your fear and will surely fold or tear as a result. Lastly, practice might not make perfect immediately, but it sure does build the muscle memory needed for that seamless flip every time.
Achieving Crispy Edges
Beyond the adept wrist flick for a successful flip, I’m focusing on the pan’s edge to ensure those pajeon edges turn out irresistibly crispy. It’s no secret that achieving that perfect crunch around the rim is just as satisfying as nailing the overall texture of the pancake. Here’s how I make my pajeon edges stand out.
First, oil selection is pivotal. Opting for an oil with a high smoke point ensures that the heat can be cranked up without the oil breaking down and causing a bitter taste or, worse, smoke filling up my kitchen. Here’s what I consider:
- Oil Selection: I choose oils like canola, vegetable, or light olive oil to withstand high temperatures.
- Pan Material: A heavy cast iron or non-stick pan provides even heat distribution.
- Heat Control: I start on medium-high and adjust as needed to maintain a vigorous sizzle without burning.
- Batter Consistency: The batter should spread to the edge but not be too runny; this creates the thin, crispy perimeter.
- Listening: The sound of the sizzle is a cue; it should be consistent, indicating the edges are frying up perfectly.
I’ve found that preheating the pan and then swirling in the oil to coat the surface, including the edges, sets the stage for crispiness. After pouring in the batter, I resist the urge to meddle with it. Letting the pancake cook undisturbed allows the edges to form that coveted golden crust. By maintaining heat control and using the right oil, the edges fry up to a delightful crunch, making my pajeon a textural masterpiece.
Ideal Cooking Temperatures
Adjusting the stove to the right temperature is crucial for cooking pajeon that’s perfectly golden without being undercooked or burnt. I’ve learned that temperature control can be a bit of an art form, especially when trying to impress Korean diners with this traditional dish. It’s about finding that sweet spot where the batter cooks through evenly, and the ingredients meld deliciously.
I start by warming the pan over a medium heat. If it’s too hot, the bottom will scorch while the top remains runny. Too cool, and I’ll end up with a sad, soggy pancake. After years of trial and error, I’ve dialed in the ideal temperature ranges, which I’ve charted below for both non-stick and cast iron pans:
| Stage | Non-stick Pan Temperature | Cast Iron Pan Temperature |
|---|---|---|
| Preheating the Pan | Medium (350°F/175°C) | Medium (375°F/190°C) |
| Adding the Batter | Medium-Low (325°F/163°C) | Medium (350°F/175°C) |
| Cooking First Side | Medium (350°F/175°C) | Medium-High (375°F/190°C) |
| Flipping the Pajeon | Medium (350°F/175°C) | Medium (350°F/175°C) |
| Finishing Second Side | Low-Medium (300°F/150°C) | Medium (350°F/175°C) |
I keep a close eye on the heat, adjusting as needed to maintain these temperatures. It’s this attention to detail that makes all the difference. With a watchful eye and a steady hand, serving up a pajeon that’s crispy, fluffy, and cooked to perfection every time becomes a reality. Trust me, the praise from satisfied diners is well worth the extra effort!
Using the Correct Cookware
Selecting the right cookware is just as essential as the temperature control I’ve mastered for crafting the perfect pajeon. Through trial and error, I’ve come to cherish the cast iron benefits that contribute to a crispy, evenly cooked pancake. Its superior heat retention ensures that once my pajeon hits that hot surface, it develops a beautiful golden-brown crust that’s music to my ears.
Yet, there are days when I lean towards the non stick advantages. It’s a breeze to flip those pancakes without fretting over sticking or tearing. Cleanup is a dream, too, which means I can indulge in my pajeon without the looming dread of scrubbing pans later.
Here’s what I’ve learned about choosing the right cookware:
- Cast Iron Skillets: They’re fantastic for heat distribution and adding that sought-after crispiness.
- Non Stick Pans: They offer ease of use and require less oil, which is great for healthier cooking.
- Heavy-Bottomed Pans: These prevent hot spots and ensure even cooking, so the entire pancake is done to perfection.
- Wide Pans: A larger surface area lets me spread the batter thinly and evenly, essential for that classic pajeon texture.
- Oven-Safe Handles: These are a bonus if I decide to finish off the pancake under the broiler for extra crispiness.
As I’ve honed my skills, I’ve realized that whether I reach for cast iron or non stick, the key is to treat my cookware right. Now, let’s transition into the next critical aspect: timing your pajeon to ensure it’s cooked just right.
Timing Your Pajeon
After finding the ideal pan, I’ve learned that nailing the timing is just as crucial for the perfect pajeon. It’s not just about waiting for the edges to crisp up; it’s a delicate dance between heat, batter consistency, and knowing just when to flip. I start with a medium-high heat, which allows the pajeon to get that desirable golden-brown crust without burning. Once the edges look firm and the surface shows bubbles, I know it’s time to flip. This usually takes about 3 to 4 minutes, but I always trust my instincts over the clock.
The second side doesn’t need as long – another 2 to 3 minutes should do it. But, I never walk away from the stove. Pajeon can go from perfectly cooked to overdone in a blink, and I’ve learned that the hard way. While I wait, I usually prepare the pajeon accompaniments, like a tangy soy dipping sauce that complements the savory pancake’s flavors perfectly.
Oil selection is another key factor I consider while cooking pajeon. A neutral oil with a high smoke point, like canola or vegetable oil, works best for me. It allows the pancake to fry without imparting any additional flavors that might clash with the pajeon or its accompaniments. Plus, it keeps the pancake from sticking, ensuring a smooth flip and a crisp exterior.
Now, with the pajeon cooked to perfection, it’s almost time to serve. Speaking of serving, let’s not forget the finishing touches that can elevate a simple pajeon into a dish that truly wows. Next up, I’ll share some serving suggestions to round off your pajeon experience.
Serving Suggestions
Plating the pajeon hot off the skillet, I turn my attention to the garnishes that will enhance its flavor and presentation. A well-chosen assortment of accompaniments can take this simple dish to new heights. For me, the right dipping sauces and accompanying beverages are key to rounding out the meal.
Here’s what I usually go for:
- Scallion Soy Dipping Sauce: A classic choice, it’s tangy and savory with a hint of sweetness. I mix soy sauce, rice vinegar, chopped scallions, a touch of sugar, and a sprinkle of sesame seeds. It’s the perfect counterpart to the crispy, savory pancake.
- Spicy Gochujang Dip: For those who like it hot, a gochujang-based dipping sauce adds a punchy kick. I combine gochujang, a bit of soy sauce, sesame oil, and a smidge of honey to balance the heat.
- Pickled Radish: The tangy crunch of danmuji, Korean yellow pickled radish, offers a refreshing contrast to the pajeon’s texture.
- Makgeolli: This traditional Korean rice wine is slightly sweet and effervescent. It pairs beautifully with the savory notes of the pancake, cutting through the richness with its gentle fizz.
- Green Tea: For a non-alcoholic option, I like to serve a pot of green tea. Its bitterness and astringency cleanse the palate between bites, making each mouthful as enjoyable as the first.
Each of these elements plays a role in creating a harmonious dining experience. The sauces awaken the palate, the pickles offer a textural counterpoint, and the beverages ensure each bite is as satisfying as the last. With these serving suggestions, I’m confident that the perfect pajeon experience is complete.
Preserving Leftover Pajeon
I’ve found that proper storage is key to keeping any leftover pajeon fresh and delicious for later enjoyment. After savoring those crispy edges and savory flavors, it’s a pity to let any go to waste. So, here’s how I make sure my pajeon stays as good as new.
Firstly, let’s talk about refrigeration. If I’m planning to eat my pajeon within a day or two, I wrap them tightly in plastic wrap or aluminum foil to prevent them from drying out. They’ll need a gentle reheating to bring back that just-cooked taste and texture. I prefer using a skillet over medium heat, flipping them occasionally until they’re warm throughout. This method helps retain the crispiness without drying them out.
Now, for freezing tips. If I’ve made a large batch, freezing is my go-to solution for longevity. I lay the pajeon flat on a baking sheet and freeze them individually before transferring them to a freezer-safe bag. This prevents them from sticking together, so I can grab one or two at a time. When I’m ready to enjoy them again, I’ve found that reheating methods directly from frozen work best. I either pop them into a toaster oven or back into a skillet, cooking them on a low heat until they’re thoroughly warmed.